Configuring Single Sign-On via SAML/OIDC
Last updated November 4, 2025
Integrating Soon with your identity provider makes logging in simple and secure for your team. Soon integrates with a wide range of authentication providers. To enable this feature, your team must be on the Enterprise plan, and you must hold an Owner role.
Follow the steps in this article to enable your team to log in to Soon with your Identity Provider through SAML and OIDC protocols, and automatically add teammates to your Soon team with Just-in-Time (JIT) provisioning.
This guide will walk you through the following steps:
- Configuring SSO via SAML/OIDC
- Enforcing SSO
- Authenticating with SSO via SAML/OIDC
- Just-in-Time (JIT) provisioning
- Managing and monitoring your SSO connection
- Supported identity providers
- Frequently asked questions
Configuring SSO via SAML/OIDC
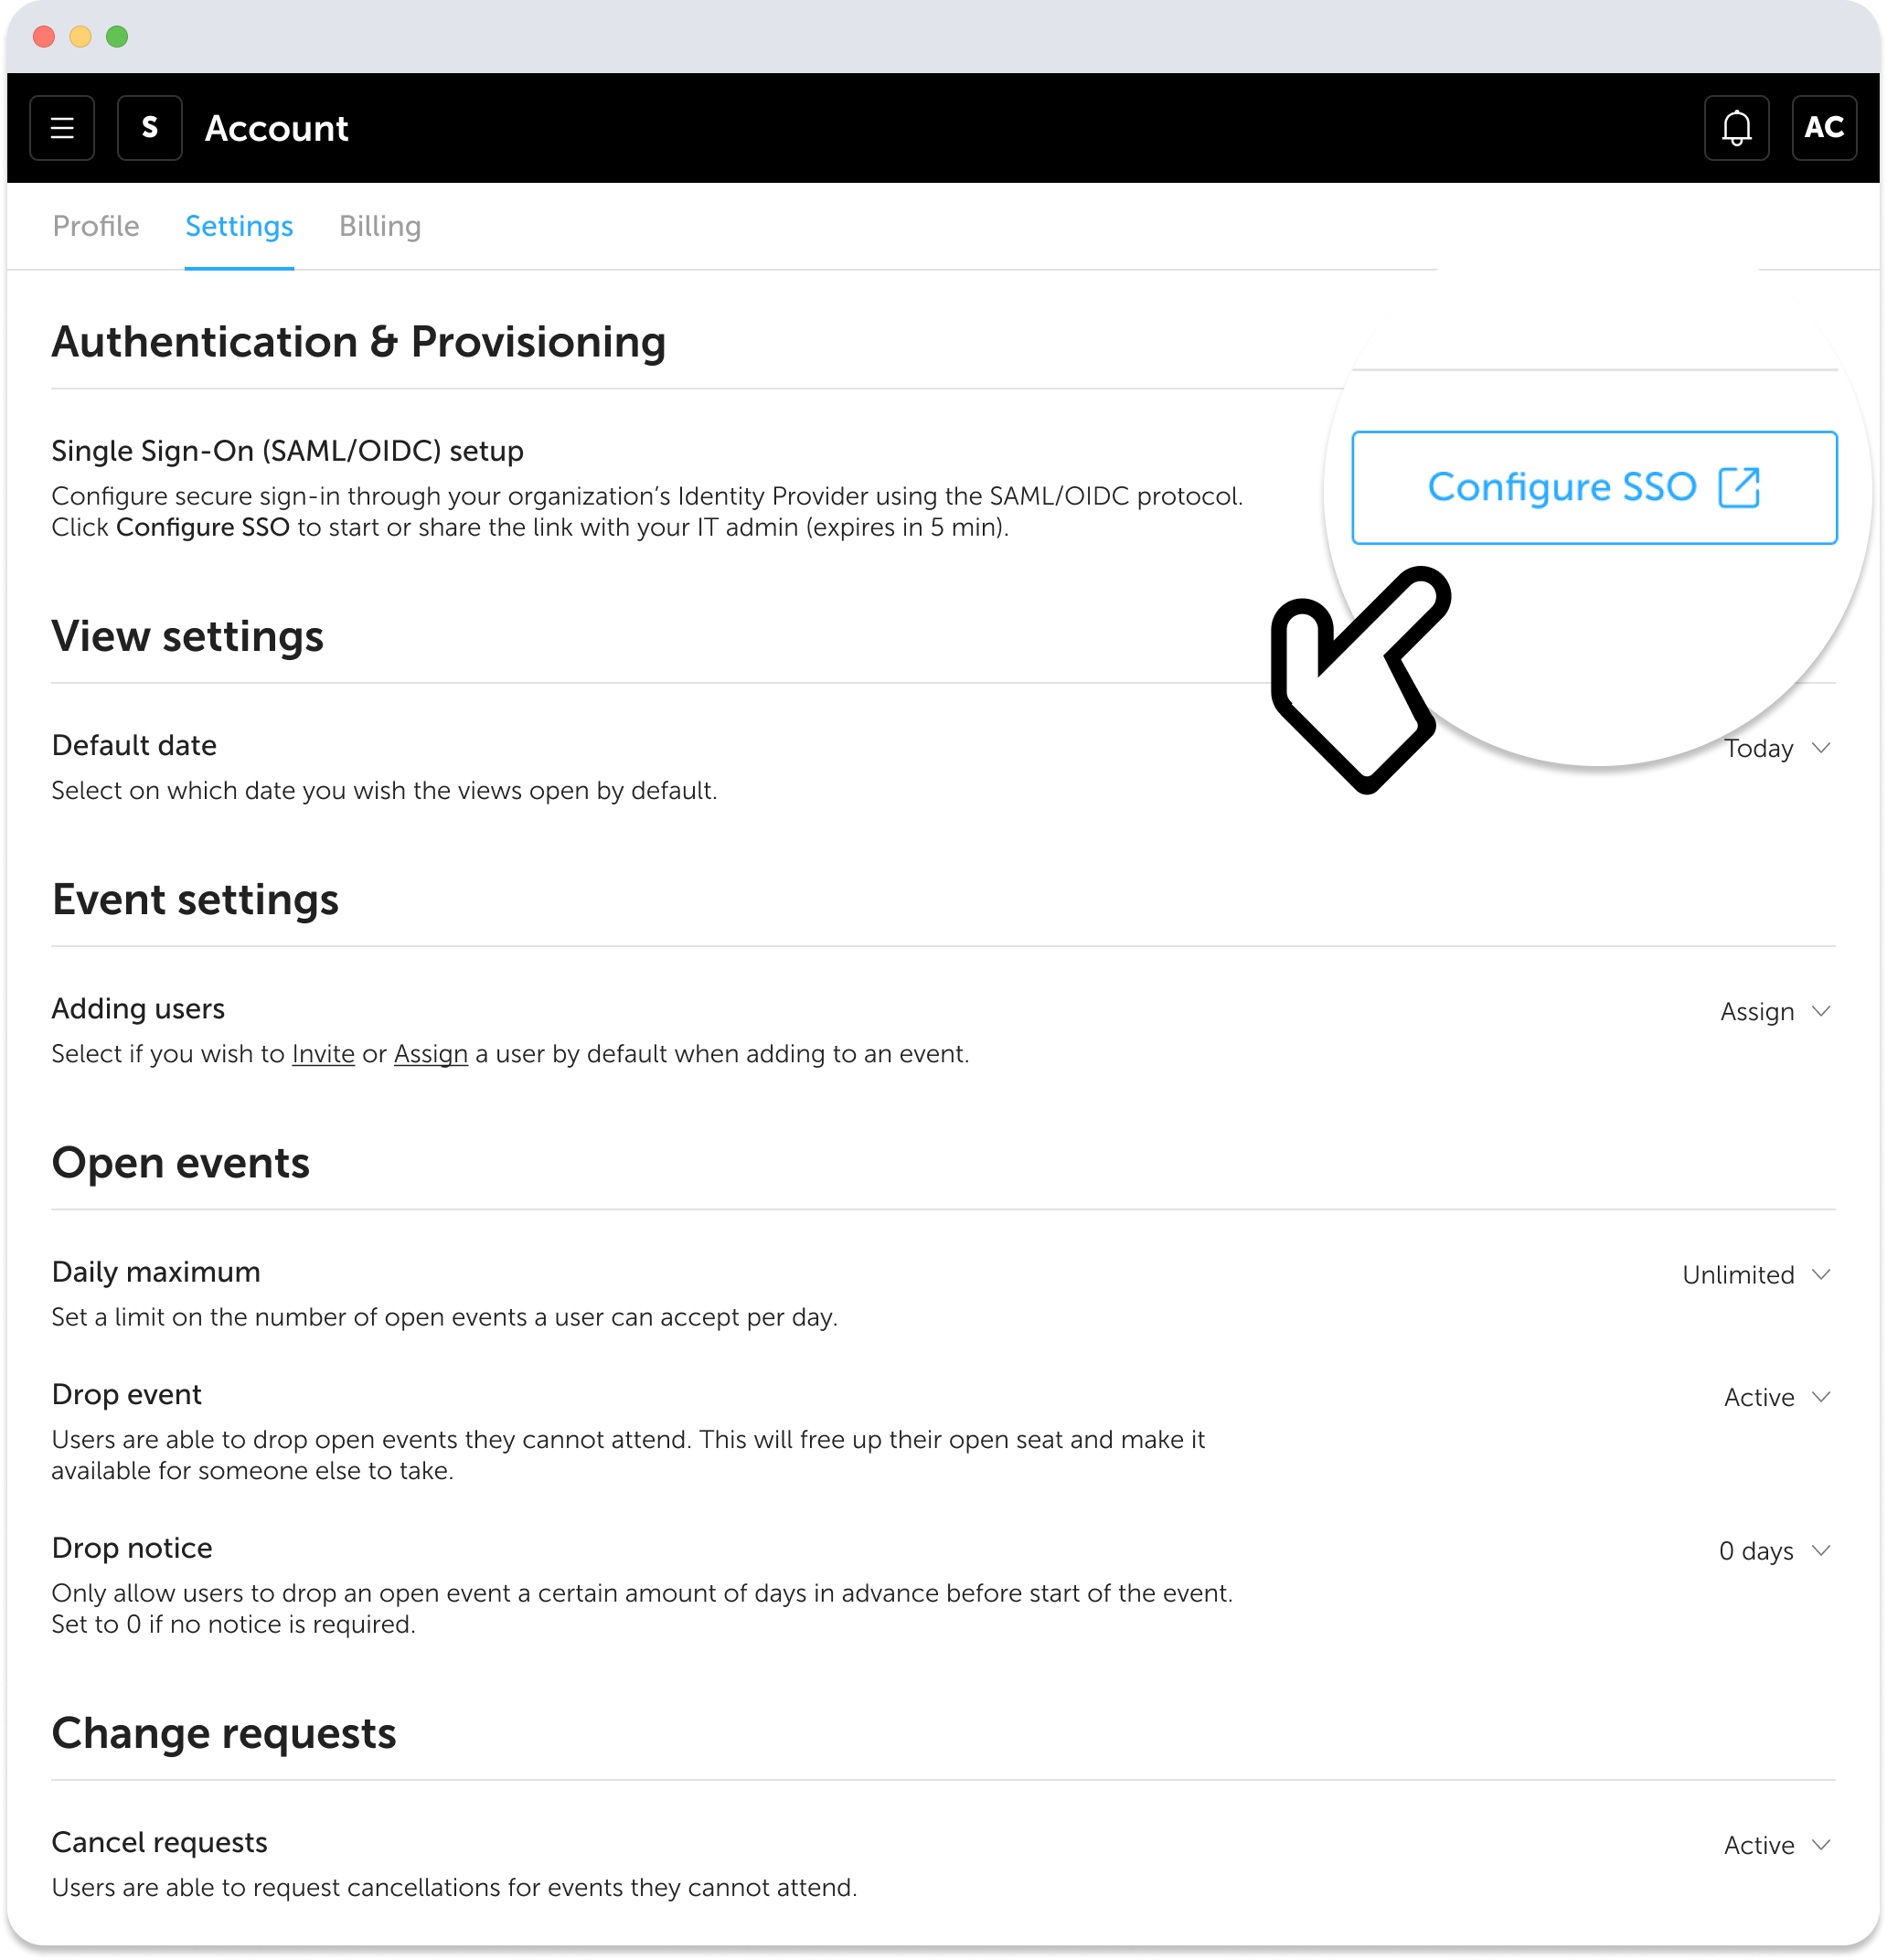
Before configuring SSO, please ensure that no users with outside domains are already invited to your team. If there are any existing users in your team with other domains, they'll be blocked from logging into Soon once SSO is enabled. Single Sign-On (SAML/OIDC) can be configured from the team account settings under the Account > Settings > Authentication & Provisioning section. Clicking the "Configure SSO" button will open a step-by-step walkthrough that helps you configure SSO for your team with your identity provider of choice.
Enforcing SSO
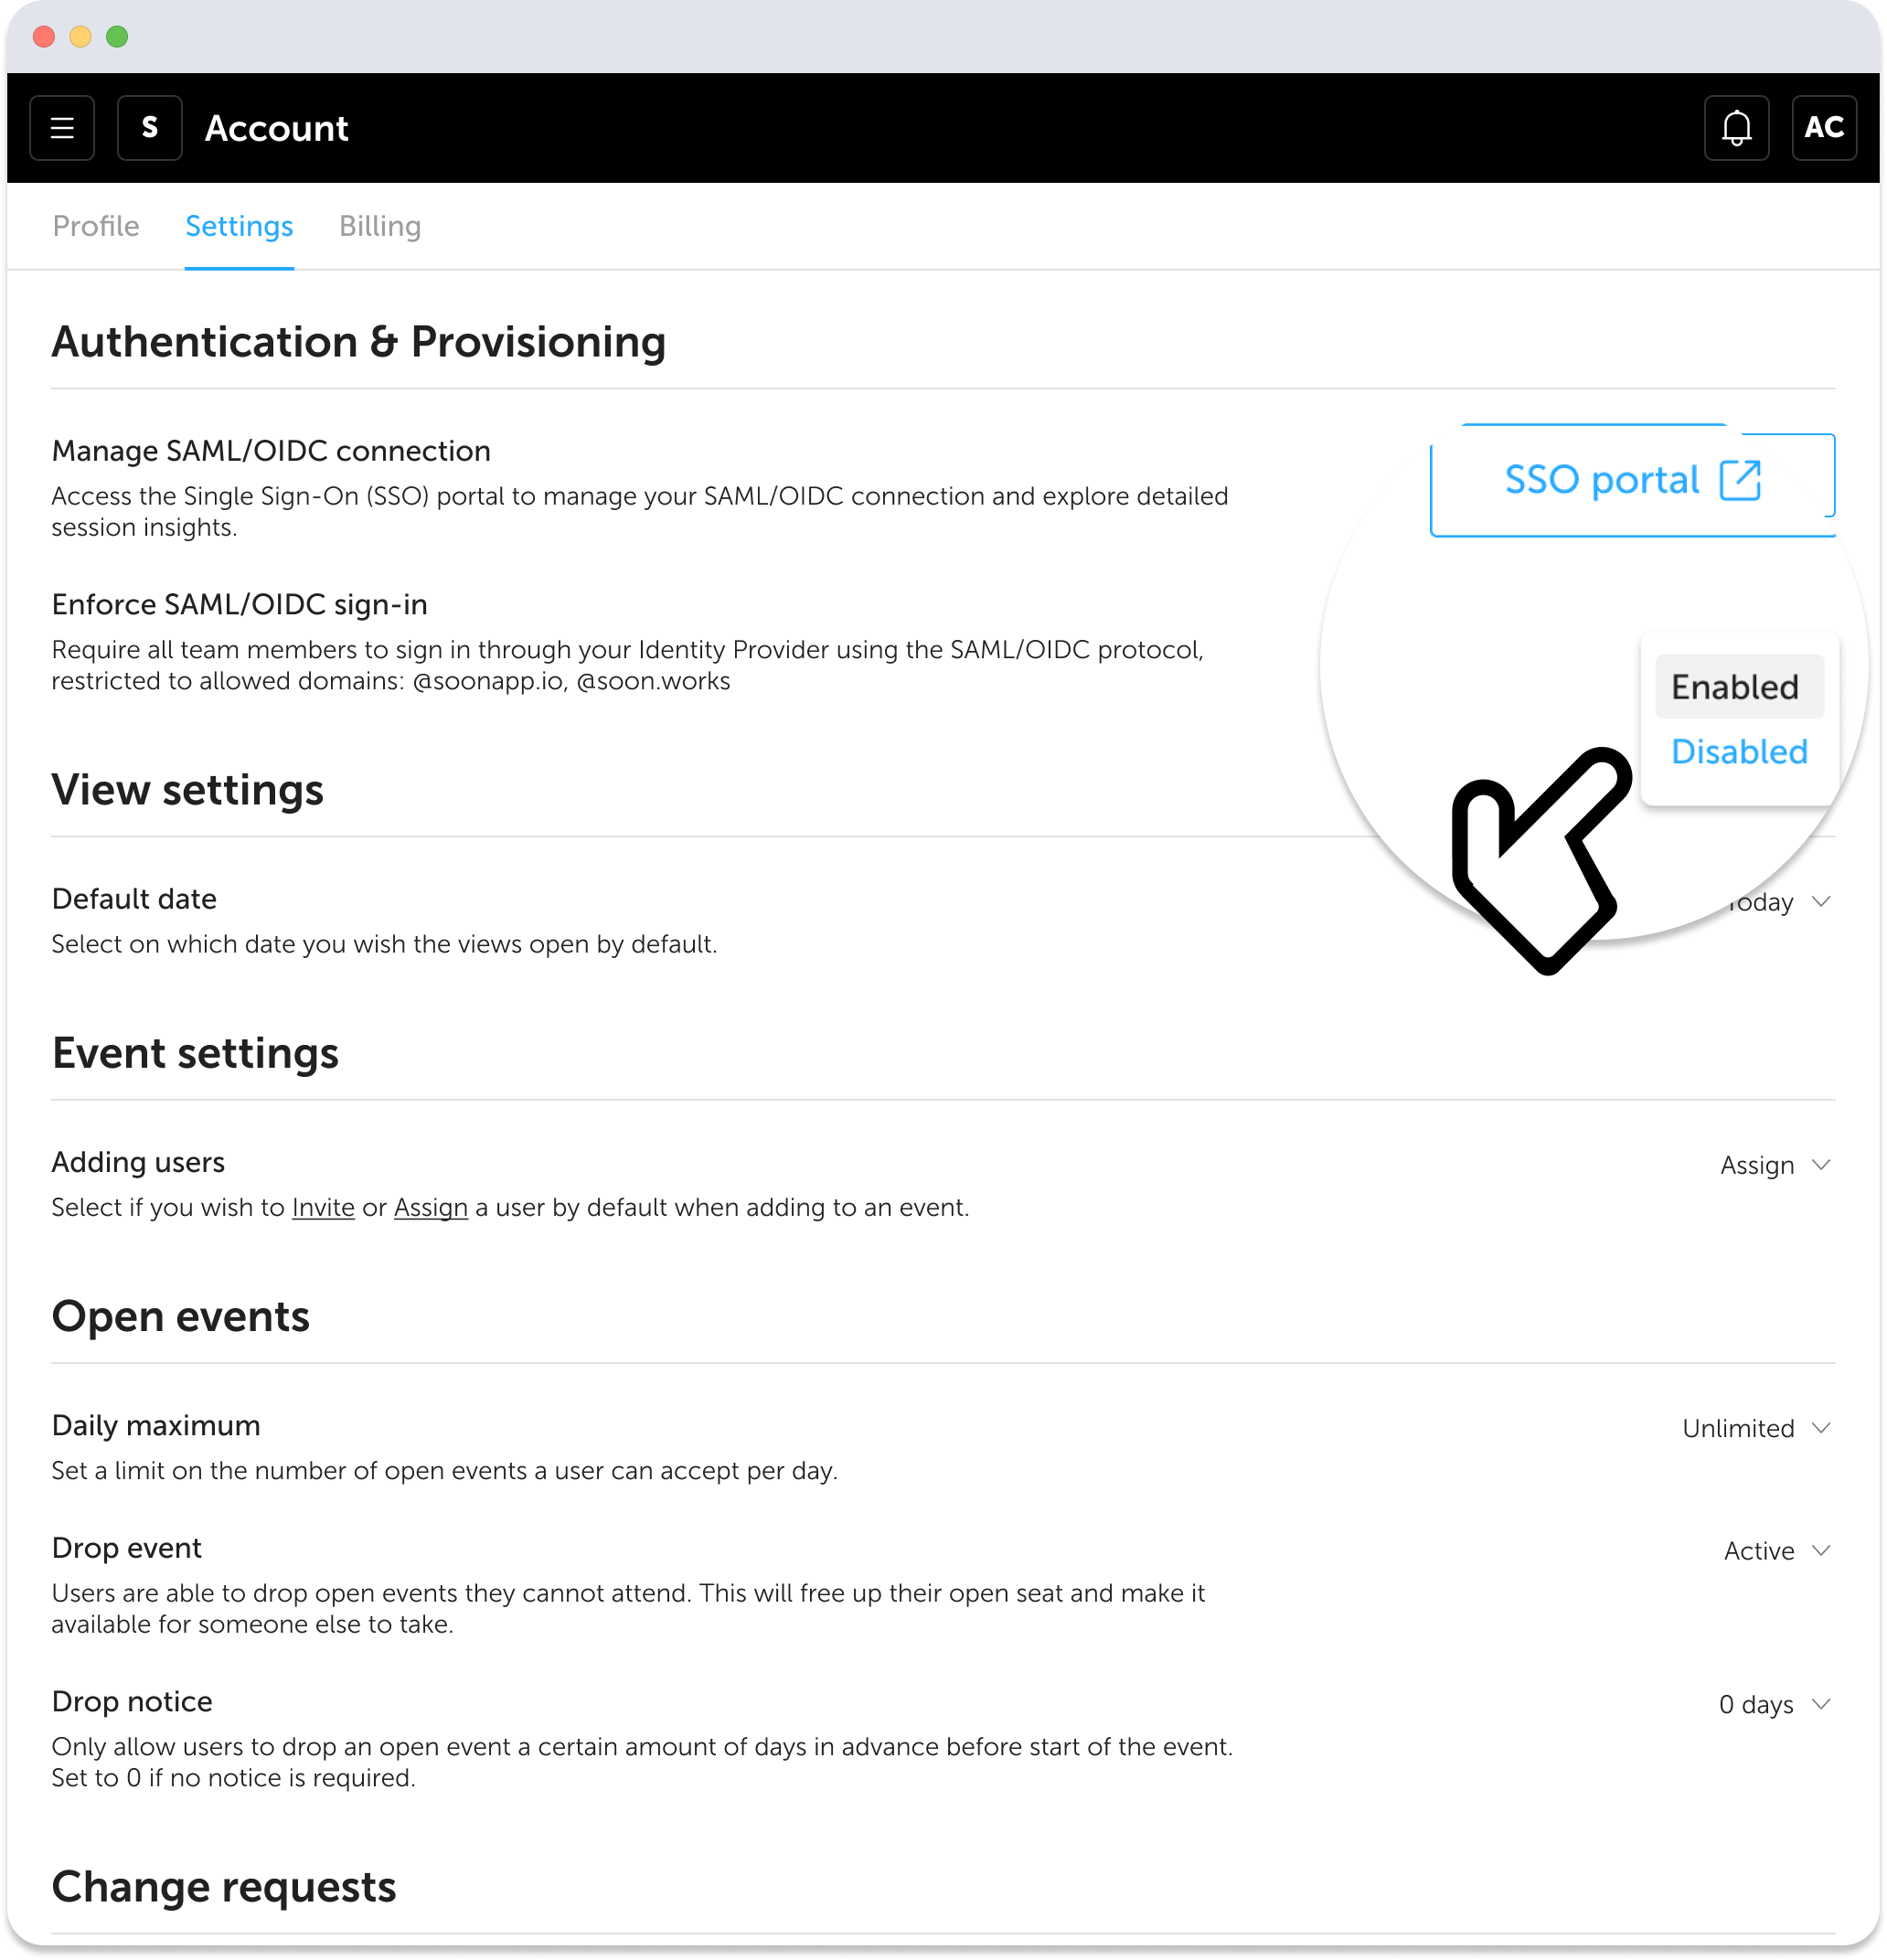
After completing the step-by-step walkthrough, SSO will be successfully configured for your team. The next step would be to Enforce SSO. By default, Single Sign-On (SAML/OIDC) is disabled. You can keep the setting disabled while you are testing and troubleshooting so that users can continue signing into Soon uninterrupted using their email and password. Once you are ready, you can flip the switch to enable the feature.
You can only enforce SSO if you are a team Owner and your current session was authenticated via SAML/OIDC. Additionally, the email address in Soon needs to match the email address of your IdP (Identity Provider) to enforce SSO. This ensures proper configuration before restricting access to the team and prevents loss of access.
Once SSO is enabled for your team, the following rules apply to the team users:
- Each team user will get an email. The email will prompt them to sign in with your identity provider (IdP). It is important that their email address in Soon matches the email address of the IdP to bind their account. Any members already signed in when SSO is enabled will be signed out;
- Connected Google and/or Microsoft OAuth accounts will be disconnected for each user;
- Users cannot edit their own email address from their profile anymore. The email field will be read-only;
- Other authorization options (the standard email+password, Google, and Microsoft buttons) are disabled for them;
- Users who want to sign in to Soon using the native Microsoft Teams app and PWA will be automatically redirected to the web browser to use your identity provider SSO. Once the browser SSO is successful, users will be redirected back to the app to continue using Soon;
- Only users with configured SSO domain(s) can be invited/added to the team;
- Inviting team members/admins with a public invite link will be disabled.
Authenticating with SSO via SAML/OIDC
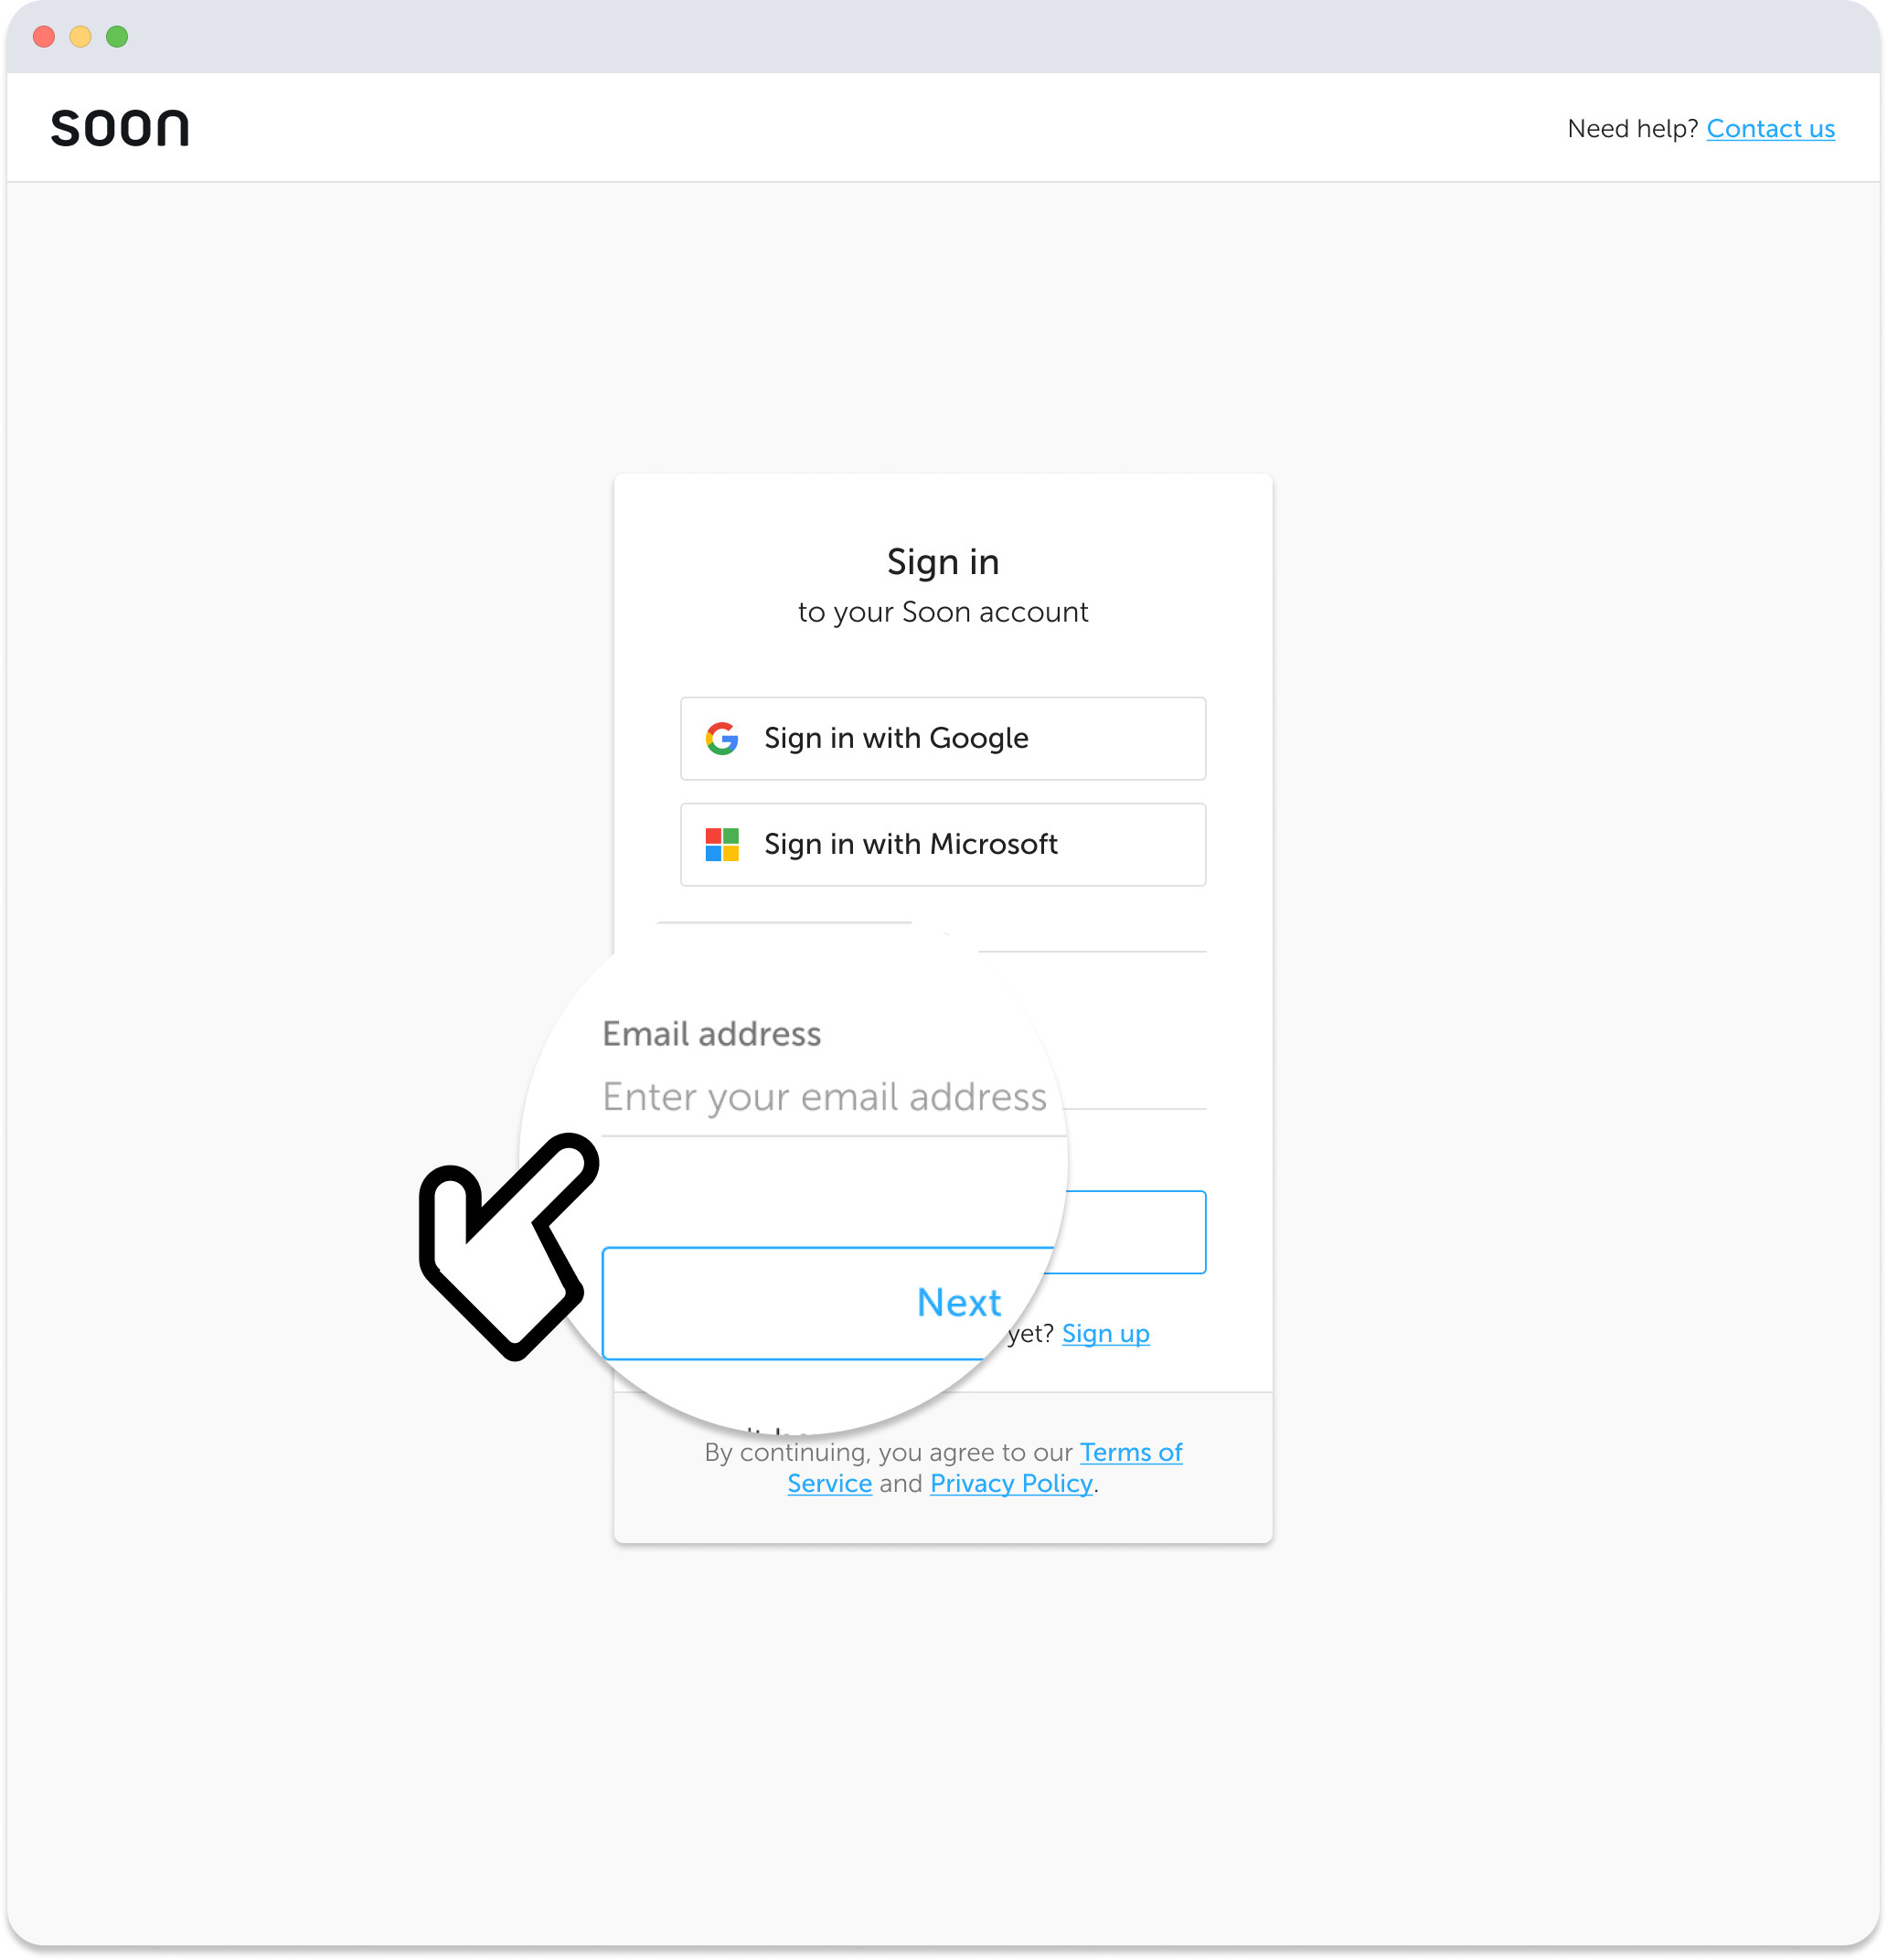
Once you have configured SSO and enabled it, your team can use SSO via SAML/OIDC to sign in to Soon. Simply enter your email address and click "Next" on the authentication page. Soon automatically identifies if your domain is SSO-enabled. If SSO is enabled, instead of showing your password, it will take you through the SSO of your identity provider instead.
Just-in-Time (JIT) provisioning
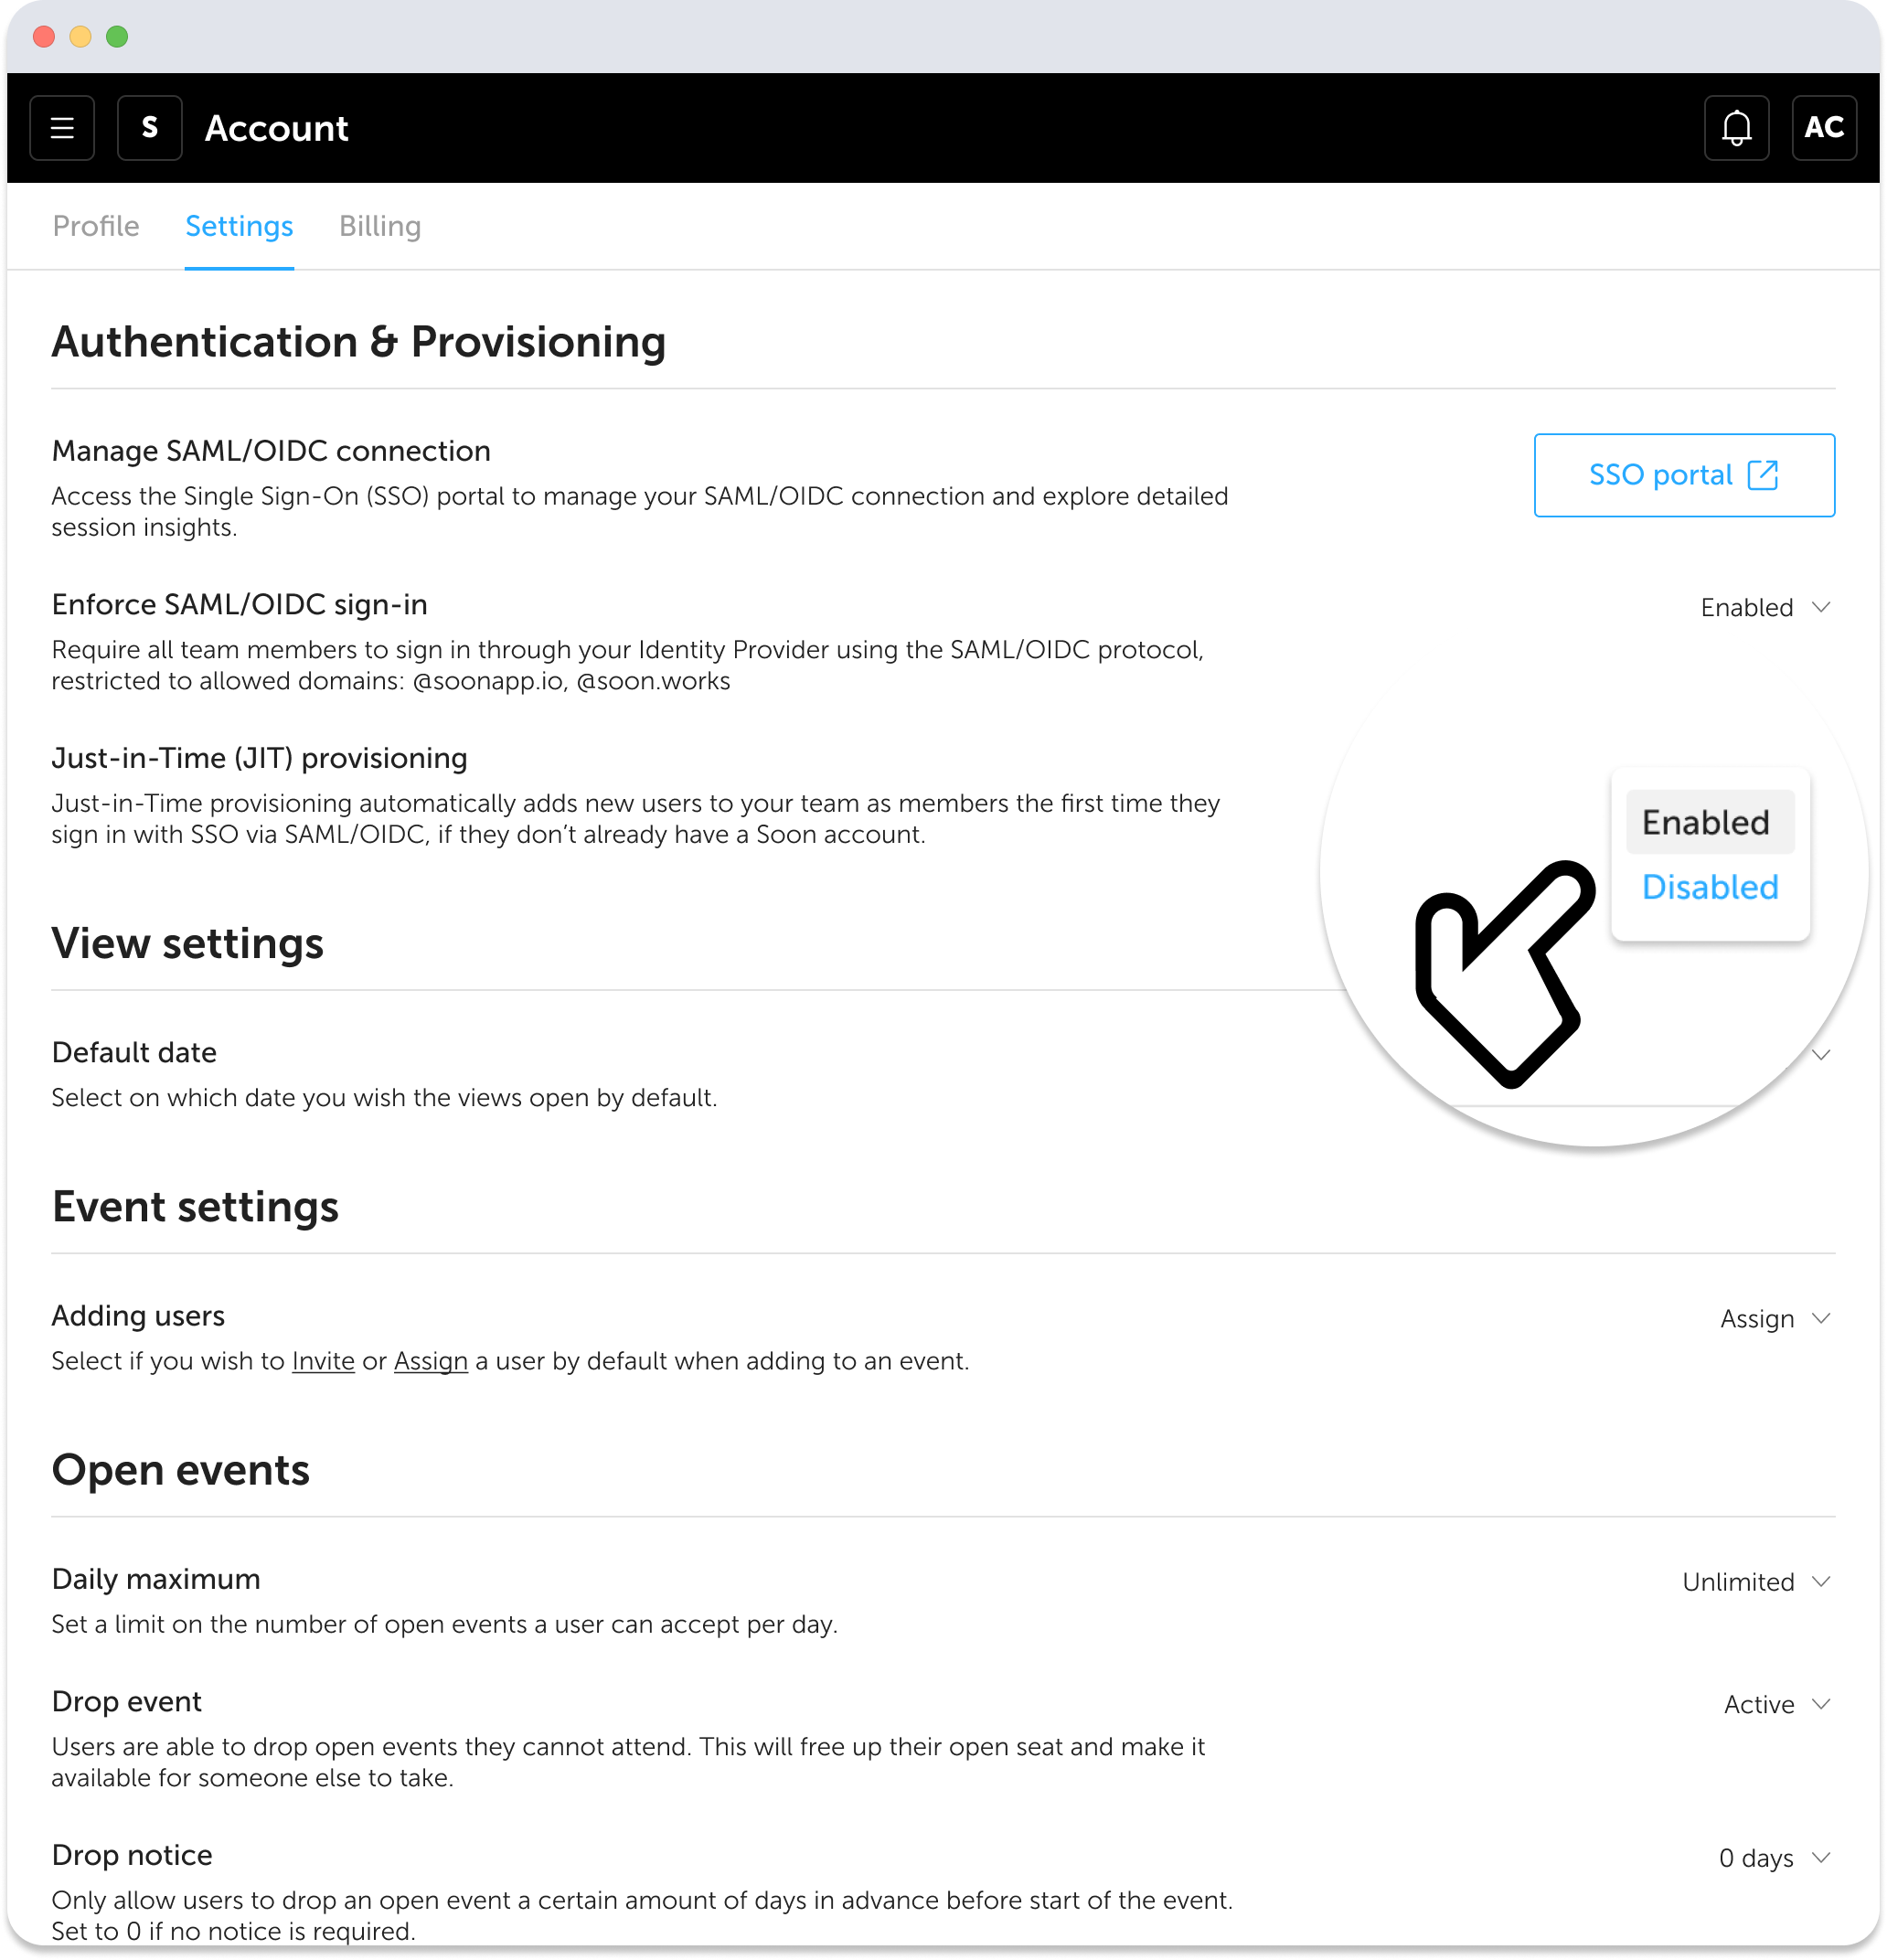
Just-in-Time provisioning will enable users to be automatically added to your Soon team the first time they sign in with SSO via SAML/OIDC, if they don’t already have a Soon account. This will help your team members engage with Soon immediately, without waiting for someone to invite them or making them go through the full internal onboarding process, and prevent creating new teams outside your managed subscription.
All users provisioned under JIT are assigned the default "Member" team access role. Once the user is registered, admins can upgrade their team access role to "Admin" if necessary.
Managing and monitoring your SSO connection
Access the Single Sign-On (SAML/OIDC) admin portal by clicking the "SSO portal" button to manage your SSO connection and get insights into session details.
Step-by-step for Okta and Microsoft Entra ID
The Configure SSO walkthrough shows the two values your identity provider needs: the ACS URL (where the identity provider sends the sign-in response) and the SP Entity ID (how Soon identifies itself). Both are specific to your team. Keep the walkthrough open in one tab and your identity provider in another.
Okta
- In Okta Admin, go to Applications and choose Browse App Catalog. Search for Soon. If Soon is not listed yet, choose Create App Integration and SAML 2.0.
- Paste the ACS URL as Single sign-on URL and the SP Entity ID as Audience URI (SP Entity ID). Leave the Name ID format as EmailAddress and the application username as Okta username (the email).
- On the Sign On tab, copy the Metadata URL and paste it into the Soon walkthrough. Soon validates the connection.
- On the Assignments tab, assign the people or groups who should have access to Soon. Only assigned people can sign in through Okta.
Microsoft Entra ID (Azure AD)
- In the Microsoft Entra admin center, go to Enterprise applications and choose New application. Search for Soon. If Soon is not in the gallery yet, choose Create your own application with the option to integrate any other application you do not find in the gallery.
- Open Single sign-on and choose SAML. Under Basic SAML Configuration, paste the SP Entity ID as Identifier (Entity ID) and the ACS URL as Reply URL (Assertion Consumer Service URL).
- Under SAML Certificates, copy the App Federation Metadata Url and paste it into the Soon walkthrough. Using the metadata URL means certificate rotations are picked up automatically.
- Under Users and groups, assign the people or groups who should have access.
Google Workspace and other providers
Google Workspace: Admin console, Apps, Web and mobile apps, Add app, Add custom SAML app. Download the IdP metadata and upload it in the walkthrough, then paste the ACS URL and Entity ID in Google. For every other provider in the supported list, the walkthrough shows the provider-specific screens.
Testing with a pilot user
- Keep Single Sign-On (SAML/OIDC) disabled in Soon while testing, so nobody is locked out.
- Ask one assigned person to open the Soon sign-in page, enter their work email address and continue. Soon detects that SSO is configured for that domain and sends them to your identity provider.
- After signing in there, they land back in Soon. Their profile shows that the account uses single sign-on.
- Only when that works, enable Single Sign-On (SAML/OIDC) for the team, as described above.
Troubleshooting
- "SSO isn’t configured for this email address": there is no active connection for that email domain yet, or the person is using a different email than the company one. Finish the walkthrough, or check the email.
- "Your Soon and SSO account don’t match": the email in the identity provider differs from the email in Soon. Align the email address on one side and try again.
- The identity provider shows an error after the redirect: the ACS URL or Entity ID was pasted incorrectly, or the person is not assigned to the application. Re-check both values in the walkthrough and the assignment in the identity provider.
- Sign-in worked before and stopped: the identity provider rotated its signing certificate. Re-paste the metadata URL in the SSO Portal; metadata URLs pick up rotations automatically, uploaded certificates do not.
- The owner cannot sign in after enforcing SSO: the owner is not assigned to the application in the identity provider. Assign the owner, or contact us to restore access.
Support
Write to [email protected] with the name of your identity provider and the exact error text, and we will help you finish the setup. Our engineering contact for identity-provider partners is [email protected].
Supported identity providers
Soon supports the following third-party identity providers:
- Okta
- Auth0
- Azure
- Microsoft ADFS
- PingOne
- OneLogin
- Duo
- JumpCloud
- PingFederate
- ADP
- Keycloak
- Cyberark
- OpenID
- VMware
- SAML
- LastPass
- miniOrange
- NetIQ
- Oracle Cloud
- Salesforce
- CAS
- ClassLink
- Cloudflare
- SimpleSAMLphp
- Rippling
- Shibboleth
Frequently asked questions
How do I purchase SSO for my team?
SSO is part of our Enterprise plan. Please contact us to discuss pricing options.
Can I use other sign-in methods after SSO has been enabled?
Once SSO is enabled, users can only sign into new or existing accounts through SSO. All previous sign-in methods (e.g., email + password, Google, and Microsoft OAuth) will not work going forward.
Can my team have multiple approved domains?
Yes. Please contact us if you wish to add more domains.
Can I remove a domain from my team?
You will not be able to remove a domain. Please contact us if you have multiple domains or recently changed your domain and need one deleted.
Can I configure SSO when I'm not a team Owner?
Yes. Contact us so we can provide you with a secure link to the configuration page.
Can I have my IT admin invited to configure SSO?
Yes. If you prefer, our team can send a secure SSO configuration link directly to your IT admin. This lets them complete the setup without you needing to initiate it yourself. The link only provides access to the SSO configuration flow. Contact us so we can invite your IT admin to the configuration page.
Is SSO required when JIT is enabled?
Yes, SSO is required for JIT provisioning.
How do we modify our SSO setup?
You can manage your IdP connection using the admin portal. You can open the admin portal by navigating to Account ➡️ Settings ➡️ Authentication & Provisioning in Soon and clicking on "SSO Portal".
What if we want to disconnect SSO?
If you want to disconnect SSO for your team, please contact us.