Configuring Directory Sync (SCIM)
Last updated November 4, 2025
Directory Sync (SCIM provisioning) helps you automatically manage your team in Soon by syncing users from your organization's identity provider (IdP). Once configured and enabled, new users will be provisioned automatically, existing users will be updated when their details change, and users will be deactivated when removed from your directory.
This guide will walk you through the following steps:
Setting up Directory Sync
Directory Sync (SCIM) is available on our Enterprise plan. To get started, contact us and we’ll enable SCIM for your team.
Once enabled:
- Go to Account → Settings → Authentication & Provisioning
- Click Configure SCIM to launch a step-by-step setup flow for your directory provider
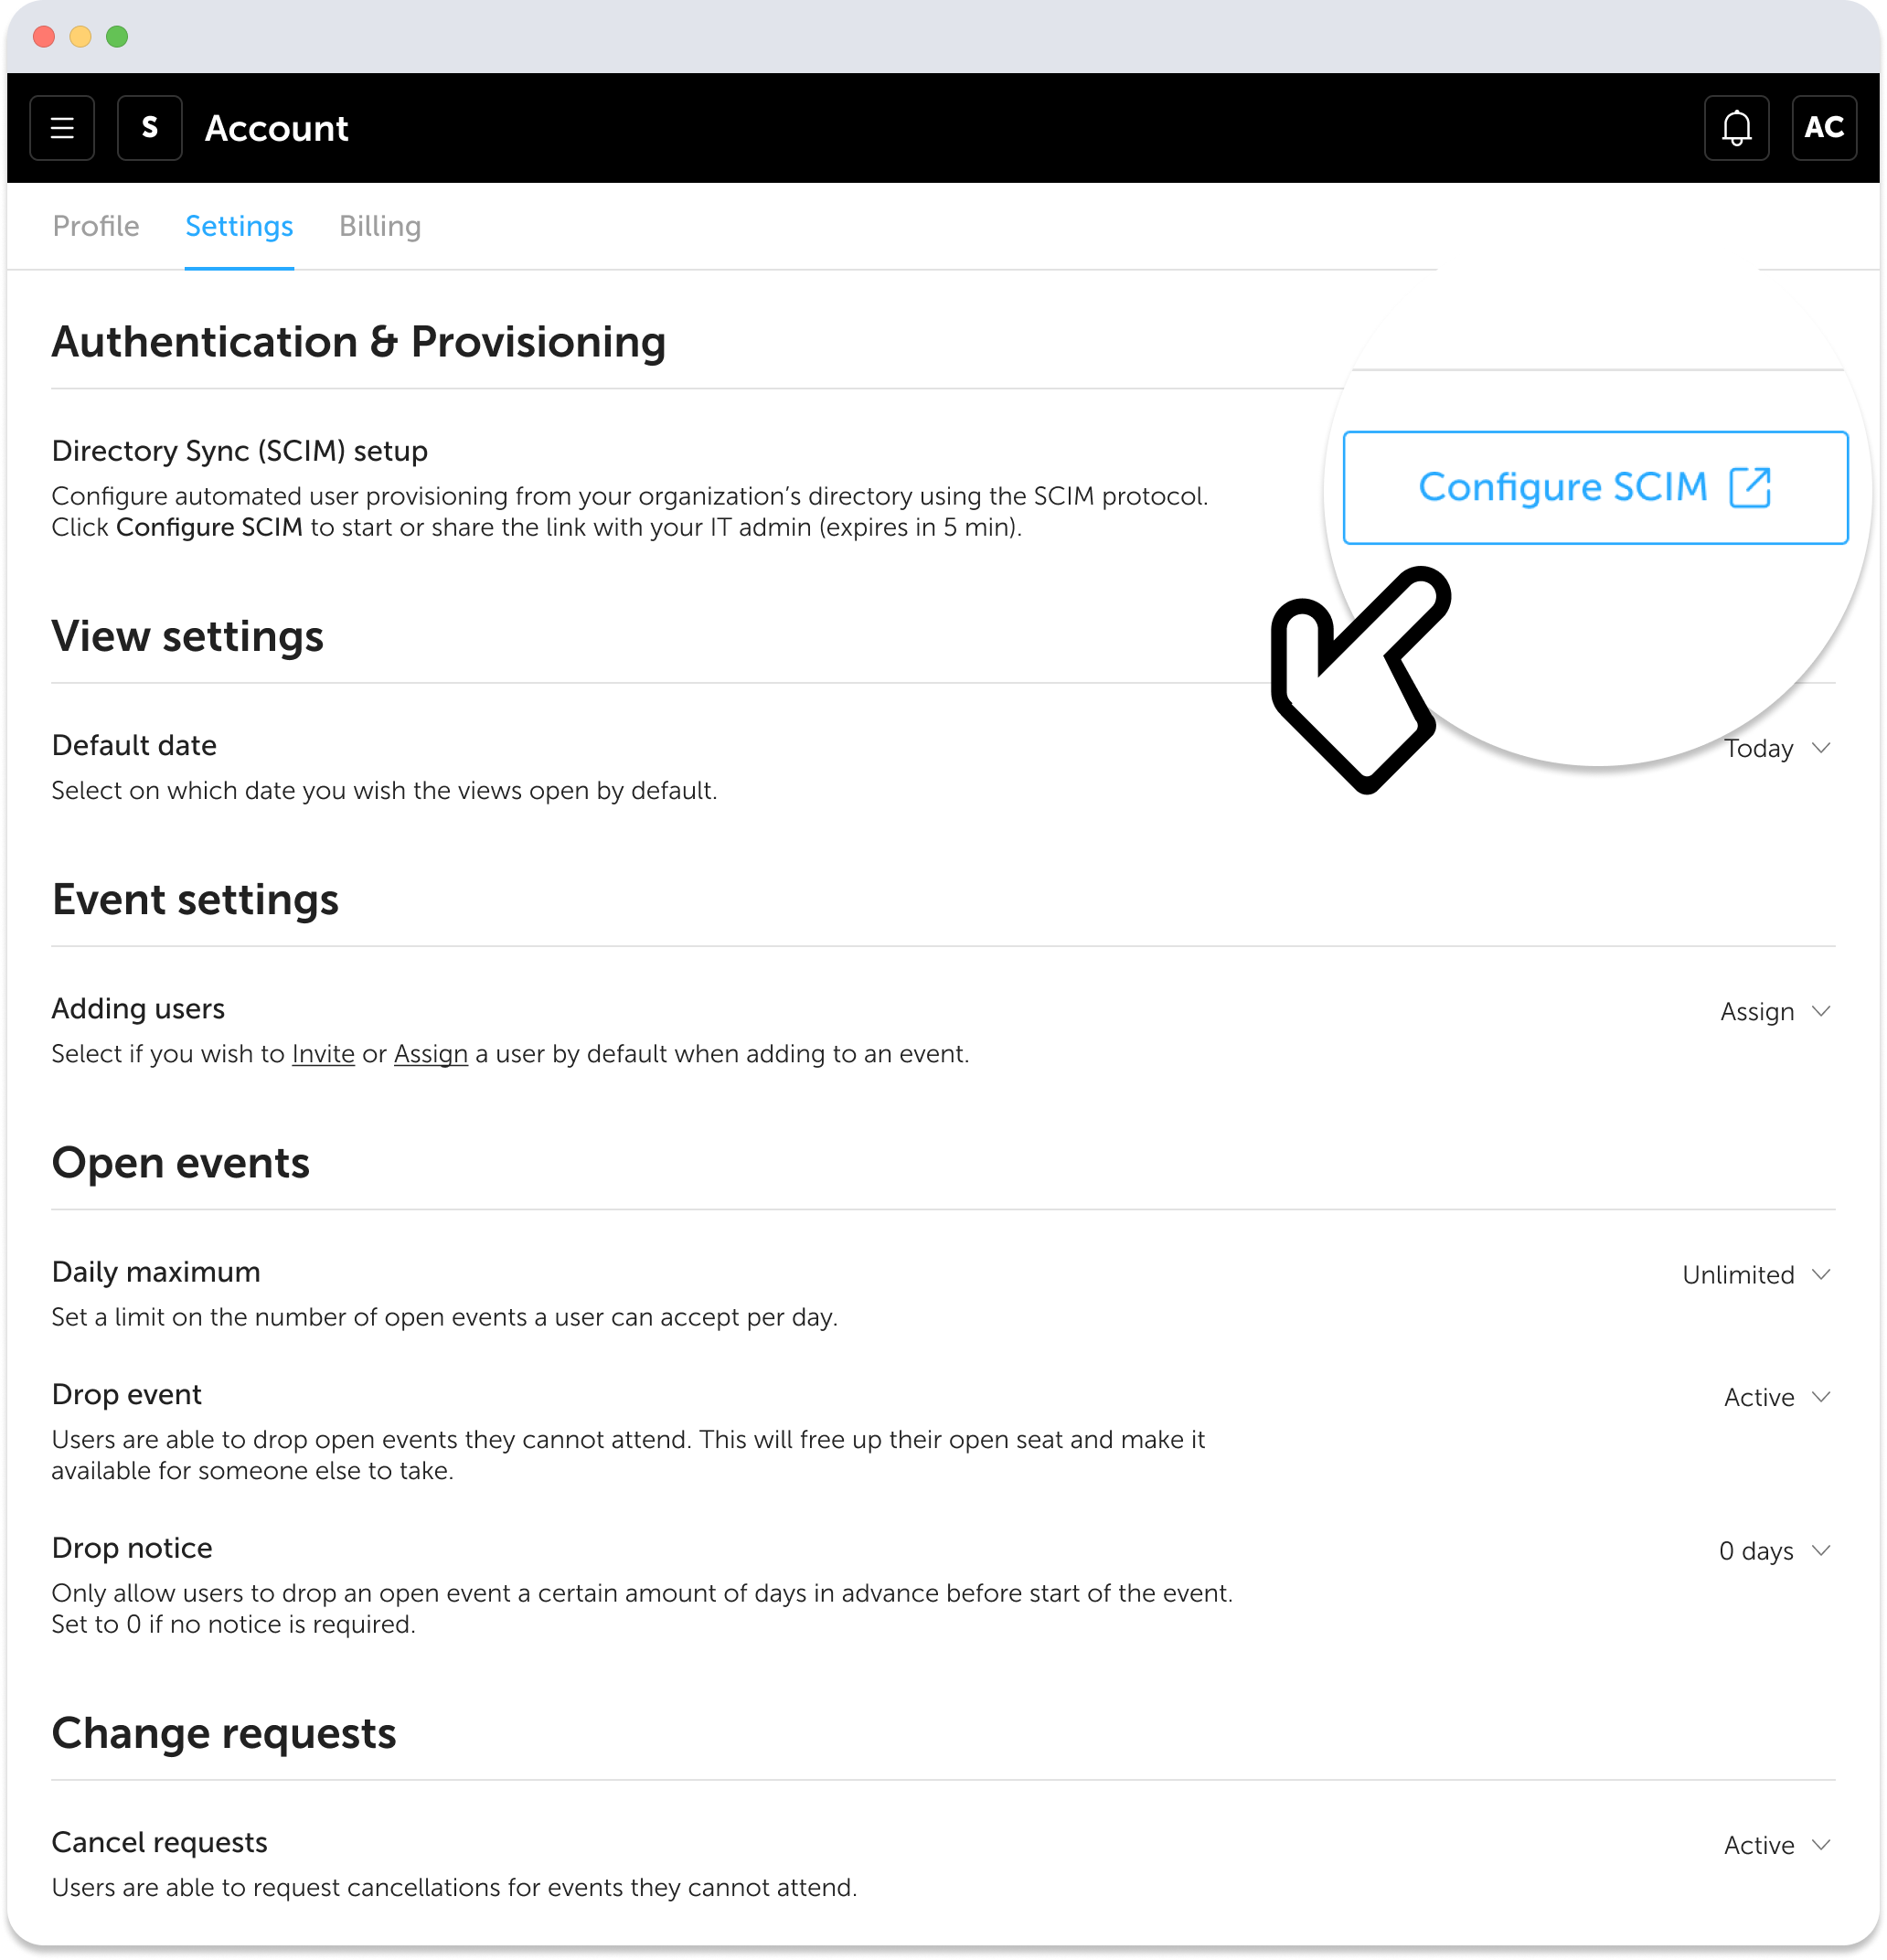
You can complete the setup yourself or share the link with your IT admin. The link is valid for 5 minutes. If it expires or you'd prefer not to generate it manually, we can also send a secure setup link directly to your IT admin.
Your IT admin can complete the configuration using the instructions provided in the portal.
Once the connection is active, a setting to Enforce SCIM provisioning will appear. The team owner can then enable SCIM syncing for the team.
Changes from your directory (e.g., new users, deactivations, name/email updates) may take up to 1 hour to reflect in Soon, depending on your provider.
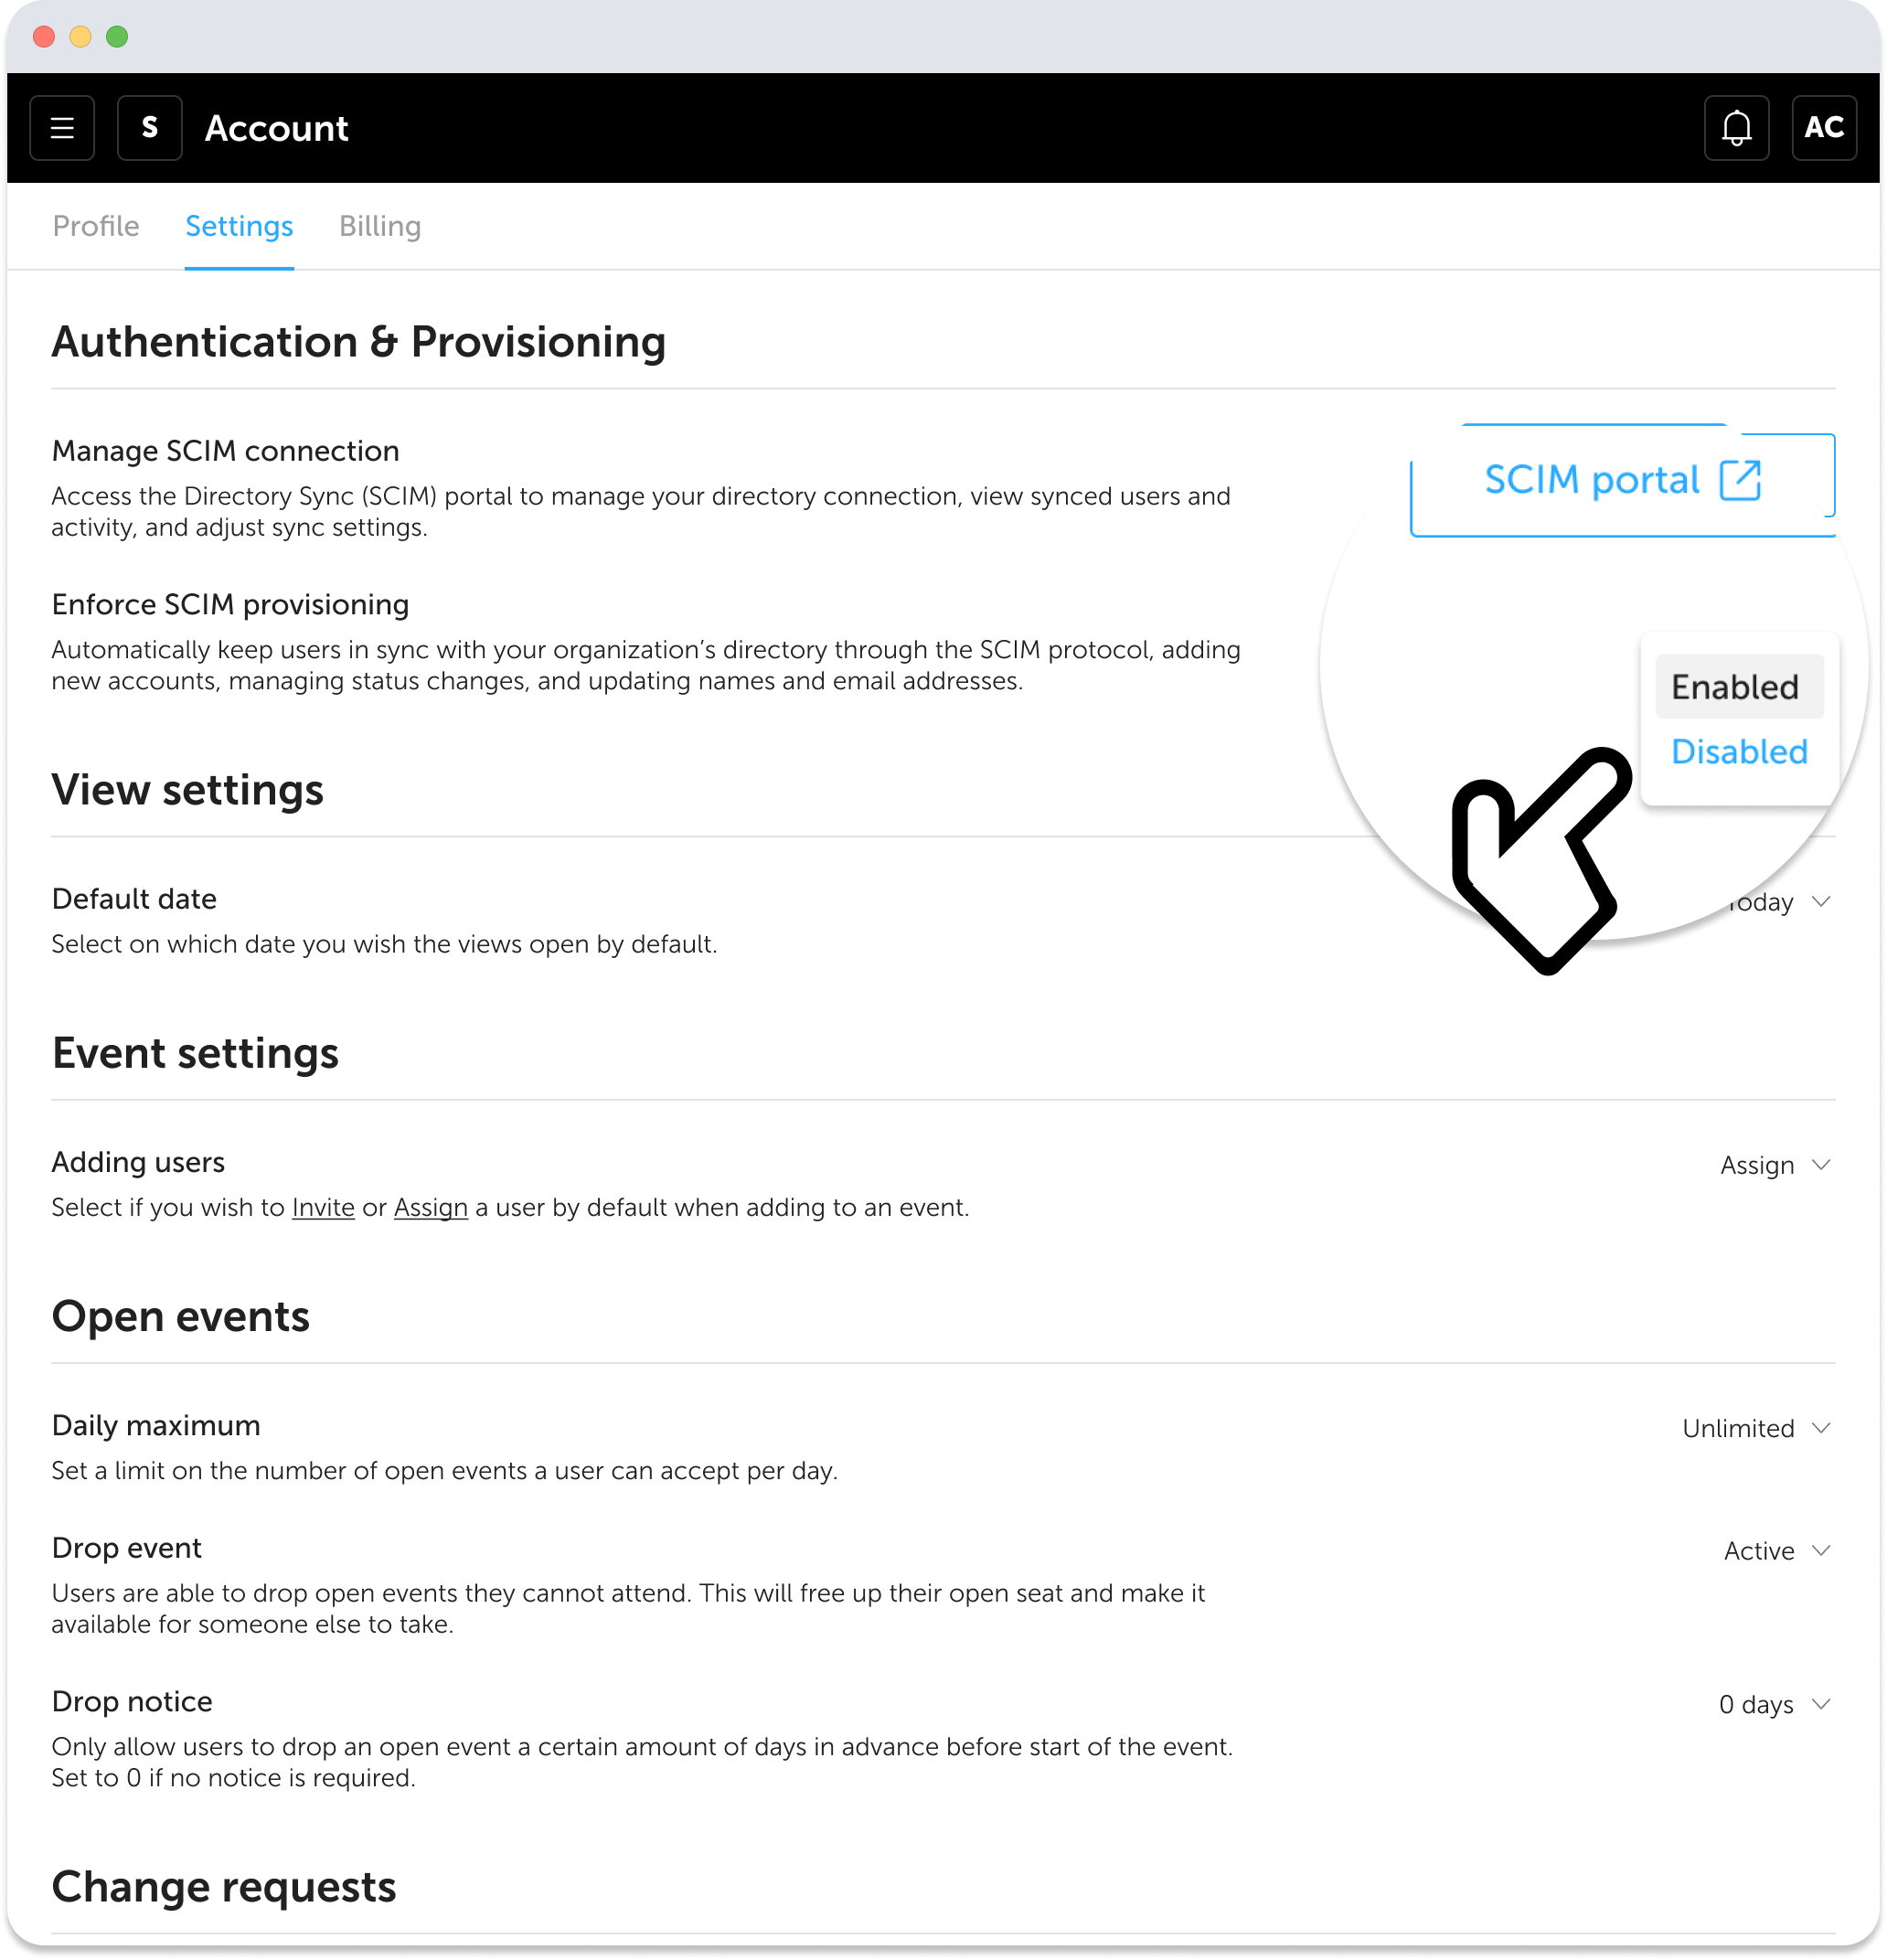
Enabling SCIM provisioning
When SCIM is enabled:
- Initial sync begins, matching existing users and provisioning new ones
- User attributes like name, email, and status are automatically kept in sync
- Synced users are marked with a SCIM badge in your user list
- Non-matched users remain unchanged and continue to be managed manually. These users will not be affected by SCIM until their email matches a user in your directory.
You can disable SCIM provisioning at any time. This will pause automatic updates but keep your configuration intact.
Managing synced users
Once SCIM is enabled, the following applies to your team’s user management:
- New users added to your directory will appear in Soon as active users
- They receive the default Member role (can be changed in Soon)
- They are not added to any boards by default
- Existing users in Soon will be matched if their email address aligns with a user in your directory
- This applies even if their status was previously invited, created, or deactivated
- Users removed from your directory will be automatically deactivated in Soon
- This preserves their data and history
SCIM never deletes users from Soon — when a user is removed from your directory, they are deactivated, not deleted. Deactivated users are excluded from billing and can be manually deleted if needed.
- SCIM-synced users:
- Are marked with a SCIM badge in the user list
- Cannot update their name, email, or status inside Soon
- Cannot be deactivated manually — they must be removed via your directory
- Can only be updated through your identity provider
Step-by-step for Okta and Microsoft Entra ID
The Configure SCIM setup flow shows the two values your identity provider needs: the SCIM endpoint (base URL) and a bearer token. The token is shown once; you can generate a new one later from the SCIM Portal.
Okta
- In Okta Admin, open the Soon application and go to the Provisioning tab. Choose Configure API Integration and tick Enable API integration.
- Paste the SCIM endpoint as the base URL and the bearer token as the API token. Choose Test API Credentials, then Save.
- Under Provisioning to App, enable Create Users, Update User Attributes and Deactivate Users.
- Under Push Groups, add the groups you want to see in Soon. Assign people or groups on the Assignments tab; each assigned person is created in Soon within the sync interval.
Microsoft Entra ID (Azure AD)
- In the Microsoft Entra admin center, open the Soon enterprise application and go to Provisioning. Set the mode to Automatic.
- Paste the SCIM endpoint as Tenant URL and the bearer token as Secret Token. Choose Test Connection, then Save.
- Keep the default attribute mappings (userName to email, givenName, familyName, active). Assign users and groups to the application, then set Provisioning Status to On. The first cycle can take up to 40 minutes; later changes follow the polling interval.
Google Workspace and other providers
Google Workspace: Admin console, Apps, Web and mobile apps, Soon, Auto-provisioning; paste the endpoint and token and choose the organisational units to sync. Other SCIM 2.0 providers (JumpCloud, OneLogin, Rippling and others) follow the same pattern.
Testing with a pilot user
- Assign one person to the Soon application in your identity provider.
- Within the sync interval they appear on the Users page in Soon with the SCIM badge.
- Unassign them: they are deactivated in Soon, keeping their history. Reassign them: the same account is reactivated.
- Only then assign the rest of the team.
Rotating the bearer token
Open the SCIM Portal from Account, Settings, Authentication & Provisioning and generate a new token. Paste it into your identity provider and test the connection again. The previous token stops working once the new one is saved. Rotate the token at least once a year, and whenever an administrator who had access to it leaves.
Troubleshooting
- "Test API Credentials" or "Test Connection" fails: the base URL or token was pasted incorrectly, or the token was replaced. Copy both again from the SCIM Portal.
- A person is assigned but does not appear in Soon: provisioning is not enabled for Create Users, the attribute mapping is incomplete (userName, givenName, familyName and email are required), or the sync interval has not passed yet.
- A person was deactivated unexpectedly: they were unassigned from the application or their directory account was disabled. Reassign them; the account and history come back.
- A name or email cannot be edited in Soon: the account is directory-managed. Change it in the directory and it syncs to Soon.
- A group is missing in Soon: it is not pushed (Okta, Push Groups) or not assigned to the application (Entra).
Support
Write to [email protected] with the name of your identity provider and the exact error text. Our engineering contact for identity-provider partners is [email protected].
Frequently asked questions
Can I still manually invite users?
Yes. By default, manual invites and user creation remain available even with SCIM enabled.
What happens to users who are not matched during the initial sync?
Users in your Soon team who are not matched with a directory user during the initial sync will keep their current status (e.g., active, invited, created, or deactivated). These users are not managed via SCIM and can still be updated manually. If their email address is later updated to match a user in your directory, they will automatically sync during the next check.
What happens if a synced user’s email address changes?
Email updates are handled automatically via sync. If a non-synced user updates their email to match someone in your directory, they will also be synced on the next check.
How quickly do changes from the directory appear in Soon?
SCIM provisioning relies on polling your identity provider. Depending on your provider (e.g., Okta, Azure), updates such as new users, deactivations, or name/email changes may take up to 1 hour to appear in Soon.
Can I use SCIM provisioning and Single Sign-On (SSO) together?
Yes. SCIM and SSO are often used together. SCIM handles provisioning and deprovisioning, while SSO controls authentication. When both are active, users are kept in sync automatically and must sign in through your organization’s identity provider.
If SSO is not enabled, provisioned users will receive an email prompting them to set a password. Setting a password is required to access their account. After signing in, they can optionally connect an OAuth provider (like Google or Microsoft) from within their account settings.
How do I purchase SCIM provisioning for my team?
SCIM provisioning is part of our Enterprise plan. Please contact us to discuss pricing and enable it for your account.
Can I configure SCIM if I’m not the team owner?
Yes. Contact us and we can provide a secure link to access the SCIM configuration page directly, even if you’re not the team owner.
Can my IT admin be invited to configure SCIM?
Yes. We can send a secure configuration link directly to your IT admin. This lets them complete the setup without requiring action from a team owner or admin. The link only provides access to the SCIM setup flow.
How do we modify our SCIM configuration?
You can manage your directory connection via the SCIM Portal in Soon. Go to Account → Settings → Authentication & Provisioning, then click SCIM Portal.
What if we want to disconnect SCIM?
If you want to disable SCIM for your team, please contact our team so we can assist you and ensure your setup is handled correctly.